The Ultimate Free Solo Blog Setup With Ghost And Gatsby

Email Newsletter
Weekly tips on front-end & UX.
Trusted by 200,000+ folks.


 Register!
 Flexible CMS. Headless & API 1st

These days it seems there are an endless number of tools and platforms for creating your own blog. However, lots of the options out there lean towards non-technical users and abstract away all of the options for customization and truly making something your own.
If you are someone who knows their way around front-end development, it can be frustrating to find a solution that gives you the control you want, while removing the admin from managing your blog content.
Enter the Headless Content Management System (CMS). With a Headless CMS, you can get all of the tools to create and organize your content, while maintaining 100% control of how it is delivered to your readers. In other words, you get all of the backend structure of a CMS while not being limited to its rigid front-end themes and templates.
When it comes to Headless CMS systems, I’m a big fan of Ghost. Ghost is open-source and simple to use, with lots of great APIs that make it flexible to use with static site builders like Gatsby.
In this article, I will show you how you can use Ghost and Gatsby together to get the ultimate personal blog setup that lets you keep full control of your front-end delivery, but leaves all the boring content management to Ghost.
Oh, and it’s 100% free to set up and run. That’s because we will be running our Ghost instance locally and then deploying to Netlify, taking advantage of their generous free tier.
Let’s dive in!
Setting Up Ghost And Gatsby
I’ve written a starter post on this before that covers the very basics, so I won’t go too in-depth into them here. Instead, I will focus on the more advanced issues and gotchas that come up when running a headless blog.
But in short, here’s what we need to do to get a basic set-up up and running that we can work from:
- Install a local version of the Gatsby Starter Blog
- Install Ghost locally
- Change the source data from Markdown to Ghost (swap out
gatsby-source-filesystem forgatsby-source-ghost) - Modify the GraphQL queries in your
gatsby-node, templates, and pages to match thegatsby-source-ghostschema
For more details on any of these steps, you can check out my previous article.
Or you can just start from the code in this Github repository.
Dealing With Images
With the basics out of the way, the first issue we run into with a headless blog that builds locally is what to do with images.
Ghost by default serves images from its own server. So when you go headless with a static site, you will run into a situation where your content is built and served from an edge provider like Netlify, but your images are still being served by your Ghost server.
This isn’t ideal from a performance perspective and it makes it impossible to build and deploy your site locally (which means you would have to pay monthly fees for a Digital Ocean droplet, AWS EC2 instance, or some other server to host your Ghost instance).
But we can get around that if we can find another solution to host our images &mdash, and thankfully, Ghost has storage converters that enable you to store images in the cloud.
For our purposes, we are going to use an AWS S3 converter, which enables us to host our images on AWS S3 along with Cloudfront to give us a similar performance to the rest of our content.
There are two open-source options available: ghost-storage-adapter-s3 and ghost-s3-compat. I use ghost-storage-adapter-s3 since I find the docs easier to follow and it was more recently updated.
That being said, if I followed the docs exactly, I got some AWS errors, so here’s the process that I followed that worked for me:
- Create a new S3 Bucket in AWS and select Disable Static Hosting
- Next, create a new Cloudfront Distribution and select the S3 Bucket as the Origin
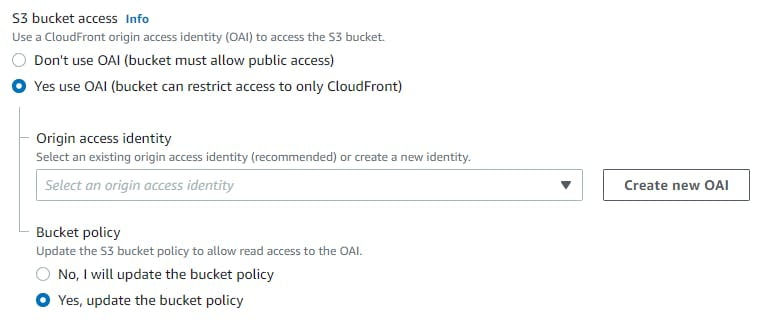
When configuring the Cloudfront Distribution, under S3 Bucket Access:
- Select “Yes, use OAI (bucket can restrict access to only Cloudfront)”
- Create a New OAI
- And finally, select “Yes, update the bucket policy”

Configuring the Cloudfront Distribution. (Large preview) This creates an AWS S3 Bucket that can only be accessed via the Cloudfront Distribution that you have created.
Then, you just need to create an IAM User for Ghost that will enable it to write new images to your new S3 Bucket. To do this, create a new Programmatic IAM User and attach this policy to it:
{
    "Version": "2012-10-17",
    "Statement": [
        {
            "Sid": "VisualEditor0",
            "Effect": "Allow",
            "Action": "s3:ListBucket",
            "Resource": "arn:aws:s3:::YOUR-S3-BUCKET-NAME"
        },
        {
            "Sid": "VisualEditor1",
            "Effect": "Allow",
            "Action": [
                "s3:PutObject",
                "s3:GetObject",
                "s3:PutObjectVersionAcl",
                "s3:DeleteObject",
                "s3:PutObjectAcl"
            ],
            "Resource": "arn:aws:s3:::YOUR-S3-BUCKET-NAME/*"
        }
    ]
}
With that, our AWS setup is complete, we just need to tell Ghost to read and write our images there instead of to its local server.
To do that, we need to go to the folder where our Ghost instance is installed and open the file: ghost.development.json orghost.production.json.(depending on what environment you’re currently running)
Then we just need to add the following:
{
  "storage": {
  "active": "s3",
  "s3": {
    "accessKeyId": "[key]",
    "secretAccessKey": "[secret]",
    "region": "[region]",
    "bucket": "[bucket]",
    "assetHost": "https://[subdomain].example.com", // cloudfront
    "forcePathStyle": true,
    "acl": "private"
  }
}
The values for accessKeyId and secretAccessKey can be found from your IAM setup, while the region and bucket refer to the region and bucket name of your S3 bucket. Finally, the assetHost is the URL of your Cloudfront distribution.
Now, if you restart your Ghost instance, you will see that any new images you save are in your S3 bucket and Ghost knows to link to them there. (Note: Ghost won’t make updates retroactively, so be sure to do this first thing after a fresh Ghost install so you don’t have to re-upload images later)
Handling Internal Links
With Images out of the way, the next tricky thing we need to think about is internal links. As you are writing content in Ghost and inserting links in Posts and Pages, Ghost will automatically add the site’s URL to all internal links.
So for example, if you put a link in your blog post that goes to /my-post/, Ghost is going to create a link that goes to https://mysite.com/my-post/.
Normally, this isn’t a big deal, but for Headless blogs this causes problems. This is because your Ghost instance will be hosted somewhere separate from your front-end and in our case it won’t even be reachable online since we will be building locally.
This means that we will need to go through each blog post and page to correct any internal links. Thankfully, this isn’t as hard as it sounds.
First, we will add this HTML parsing script in a new file called replaceLinks.js and put it in a new utils folder at src/utils:
const url = require(`url`);
const cheerio = require('cheerio');

const replaceLinks = async (htmlInput, siteUrlString) => {
  const siteUrl = url.parse(siteUrlString);
  const $ = cheerio.load(htmlInput);
  const links = $('a');
  links.attr('href', function(i, href){
    if (href) {
      const hrefUrl = url.parse(href);
      if (hrefUrl.protocol === siteUrl.protocol && hrefUrl.host === siteUrl.host) {
        return hrefUrl.path
      }

      return href;
    }

  });
  return $.html();
}

module.exports = replaceLinks;
Then we will add the following to our gatsby-node.js file:
exports.onCreateNode = async ({ actions, node, getNodesByType }) => {
  if (node.internal.owner !== `gatsby-source-ghost`) {
    return
  }
  if (node.internal.type === 'GhostPage' || node.internal.type === 'GhostPost') {
    const settings = getNodesByType(`GhostSettings`);
    actions.createNodeField({
      name: 'html',
      value: replaceLinks(node.html, settings[0].url),
      node
    })
  }
}
You will see that we are adding two new packages in replaceLinks.js, so let’s start by installing those with NPM:
npm install --save url cheerio
In our gatsby-node.js file, we are hooking into Gatsby’s onCreateNode, and specifically into any nodes that are created from data that comes from gatsby-source-ghost (as opposed to metadata that comes from our config file that we don’t care about for now).
Then we are checking the node type, to filter out any nodes that are not Ghost Pages or Posts (since these are the only ones that will have links inside their content).
Next, we are getting the URL of the Ghost site from the Ghost settings and passing that to our removeLinks function along with the HTML content from the Page/Post.
In replaceLinks, we are using cheerio to parse the HTML. Then we can then select all of the links in this HTML content and map through their href attributes. We can then check if the href attribute matches the URL of the Ghost Site — if it does, we will replace the href attribute with just the URL path, which is the internal link that we are looking for (e.g. something like /my-post/).
Finally, we are making this new HTML content available through GraphQL using Gatsby’s createNodeField (Note: we must do it this way since Gatsby does not allow you to overwrite fields at this phase in the build).
Now our new HTML content will be available in our blog-post.js template and we can access it by changing our GraphQL query to:
ghostPost(slug: { eq: $slug }) {
  id
  title
  slug
  excerpt
  published_at_pretty: published_at(formatString: "DD MMMM, YYYY")
  html
  meta_title
  fields {
  html
  }
}
And with that, we just need to tweak this section in the template:
<section
  dangerouslySetInnerHTML={{ __html: post.html }}
  itemProp="articleBody"
/>
To be:
<section
 dangerouslySetInnerHTML={{ __html: post.fields.html }}
  itemProp="articleBody"
/>
This makes all of our internal links reachable, but we still have one more problem. All of these links are <a>anchor tags while with Gatsby we should be using Gatsby Link for internal links (to avoid page refreshes and to provide a more seamless experience).
Thankfully, there is a Gatsby plugin that makes this really easy to solve. It’s called gatsby-plugin-catch-links and it looks for any internal links and automatically replaces the <a> anchor tags with Gatsby <Link>.
All we need to do is install it using NPM:
npm install --save gatsby-plugin-catch-links
And add gatsby-plugin-catch-links into our plugins array in our gatsby-config file.
Adding Templates And Styles
Now the big stuff is technically working, but we are missing out on some of the content from our Ghost instance.
The Gatsby Starter Blog only has an Index page and a template for Blog Posts, while Ghost by default has Posts, Pages, as well as pages for Tags and Authors. So we need to create templates for each of these.
For this, we can leverage the Gatsby starter that was created by the Ghost team.
As a starting point for this project, we can just copy and paste a lot of the files directly into our project. Here’s what we will take:
- The entire folder src/components/common/meta — we will copy this into our
src/componentsfolder (so we will now have a foldersrc/components/meta) - The component files Pagination.js and PostCard.js — we will copy these into our
src/componentsfolder - We will create a
src/utilsfolder and add two files from theirsrc/utilsfolder: fragments.js and siteConfig.js - And the following templates from their
src/templatesfolder: tag.js, page.js, author.js, and post.js
The meta files are adding JSON structured data markup to our templates. This is a great benefit that Ghost offers by default on their platform and they’ve transposed it into Gatsby as part of their starter template.
Then we took the Pagination and PostCard.js components that we can drop right into our project. And with those components, we can take the template files and drop them into our project and they will work.
The fragments.js file makes our GraphQL queries a lot cleaner for each of our pages and templates — we now just have a central source for all of our GraphQL queries. And the siteConfig.js file has a few Ghost configuration options that are easiest to put in a separate file.
Now we will just need to install a few npm packages and update our gatsby-node file to use our new templates.
The packages that we will need to install are gatsby-awesome-pagination, @tryghost/helpers, and @tryghost/helpers-gatsby.
So we will do:
npm install --save gatsby-awesome-pagination @tryghost/helpers @tryghost/helpers-gatsby
Then we need to make some updates to our gatsby-node file.
First, we will add the following new imports to the top of our file:
const { paginate } = require(`gatsby-awesome-pagination`);
const { postsPerPage } = require(`./src/utils/siteConfig`);
Next, in our exports.createPages, we will update our GraphQL query to:
{
  allGhostPost(sort: { order: ASC, fields: published_at }) {
      edges {
          node {
              slug
          }
      }
  }
  allGhostTag(sort: { order: ASC, fields: name }) {
      edges {
          node {
              slug
              url
              postCount
          }
      }
  }
  allGhostAuthor(sort: { order: ASC, fields: name }) {
      edges {
          node {
              slug
              url
              postCount
          }
      }
  }
  allGhostPage(sort: { order: ASC, fields: published_at }) {
      edges {
          node {
              slug
              url
          }
      }
  }
}
This will pull all of the GraphQL data we need for Gatsby to build pages based on our new templates.
To do that, we will extract all of those queries and assign them to variables:
// Extract query results
  const tags = result.data.allGhostTag.edges
  const authors = result.data.allGhostAuthor.edges
  const pages = result.data.allGhostPage.edges
  const posts = result.data.allGhostPost.edges
Then we will load all of our templates:
// Load templates
  const tagsTemplate = path.resolve(`./src/templates/tag.js`)
  const authorTemplate = path.resolve(`./src/templates/author.js`)
  const pageTemplate = path.resolve(`./src/templates/page.js`)
  const postTemplate = path.resolve(`./src/templates/post.js`)
Note here that we are replacing our old blog-post.js template with post.js, so we can go ahead and delete blog-post.js from our templates folder.
Finally, we will add this code to build pages from our templates and GraphQL data:
// Create tag pages
tags.forEach(({ node }) => {
    const totalPosts = node.postCount !== null ? node.postCount : 0

    // This part here defines, that our tag pages will use
    // a `/tag/:slug/` permalink.
    const url = `/tag/${node.slug}`

    const items = Array.from({length: totalPosts})

    // Create pagination
    paginate({
        createPage,
        items: items,
        itemsPerPage: postsPerPage,
        component: tagsTemplate,
        pathPrefix: ({ pageNumber }) => (pageNumber === 0) ? url : `${url}/page`,
        context: {
            slug: node.slug
        }
    })
})

// Create author pages
authors.forEach(({ node }) => {
    const totalPosts = node.postCount !== null ? node.postCount : 0

    // This part here defines, that our author pages will use
    // a `/author/:slug/` permalink.
    const url = `/author/${node.slug}`

    const items = Array.from({length: totalPosts})

    // Create pagination
    paginate({
        createPage,
        items: items,
        itemsPerPage: postsPerPage,
        component: authorTemplate,
        pathPrefix: ({ pageNumber }) => (pageNumber === 0) ? url : `${url}/page`,
        context: {
            slug: node.slug
        }
    })
})

// Create pages
pages.forEach(({ node }) => {
  // This part here defines, that our pages will use
  // a `/:slug/` permalink.
  node.url = `/${node.slug}/`

  createPage({
      path: node.url,
      component: pageTemplate,
      context: {
          // Data passed to context is available
          // in page queries as GraphQL variables.
          slug: node.slug,
      },
  })
})

// Create post pages
posts.forEach(({ node }) => {
    // This part here defines, that our posts will use
    // a `/:slug/` permalink.
    node.url = `/${node.slug}/`
    createPage({
        path: node.url,
        component: postTemplate,
        context: {
            // Data passed to context is available
            // in page queries as GraphQL variables.
            slug: node.slug,
        },
    })
})
Here, we are looping in turn through our tags, authors, pages, and posts. For our pages and posts, we are simply creating slugs and then creating a new page using that slug and telling Gatsby what template to use.
For the tags and author pages, we are also adding pagination info using gatsby-awesome-pagination that will be passed into the page’s pageContext.
With that, all of our content should now be successfully built and displayed. But we could use a bit of work on styling. Since we copied over our templates directly from the Ghost Starter, we can use their styles as well.
Not all of these will be applicable, but to keep things simple and not get too bogged down in styling, I took all of the styles from Ghost’s src/styles/app.css starting from the section Layout until the end. Then you will just paste these into the end of your src/styles.css file.
Observe all of the styles starting with kg — this refers to Koening which is the name of the Ghost editor. These styles are very important for the Post and Page templates, as they have specific styles that handle the content that is created in the Ghost editor. These styles ensure that all of the content you are writing in your editor is translated over and displayed on your blog correctly.
Lastly, we need our page.js and post.js files to accommodate our internal link replacement from the previous step, starting with the queries:
Page.js
ghostPage(slug: { eq: $slug } ) {
  ...GhostPageFields
    fields {
      html
     }
}
Post.js
ghostPost(slug: { eq: $slug } ) {
  ...GhostPostFields
    fields {
      html
    }
}
And then the sections of our templates that are using the HTML content. So in our post.js we will change:
<section
className="content-body load-external-scripts"
dangerouslySetInnerHTML={{ __html: post.html }} />
To:
<section
className="content-body load-external-scripts"
dangerouslySetInnerHTML={{ __html: post.fields.html }} />
And similarly, in our page.js file, we will change page.html to page.fields.html.
Dynamic Page Content
One of the disadvantages of Ghost when used as a traditional CMS, is that it is not possible to edit individual pieces of content on a page without going into your actual theme files and hard coding it.
Say you have a section on your site that is a Call-to-Action or customer testimonials. If you want to change the text in these boxes, you will have to edit the actual HTML files.
One of the great parts of going headless is that we can make dynamic content on our site that we can easily edit using Ghost. We are going to do this by using Pages that we will mark with ‘internal’ tags or tags that start with a # symbol.
So as an example, let’s go into our Ghost backend, create a new Page called Message, type something as content, and most importantly, we will add the tag #message.
Now let’s go back to our gatsby-node file. Currently, we are building pages for all of our tags and pages, but if we modify our GraphQL query in createPages, we can exclude everything internal:
allGhostTag(sort: { order: ASC, fields: name }, **filter: {slug: {regex: "/^((?!hash-).)*$/"}}**) {
    edges {
        node {
            slug
            url
            postCount
        }
    }
}
//...
allGhostPage(sort: { order: ASC, fields: published_at }, **filter: {tags: {elemMatch: {slug: {regex: "/^((?!hash-).)*$/"}}}}**) {
    edges {
        node {
            slug
            url
            html
        }
    }
}
We are adding a filter on tag slugs with the regex expression /^((?!hash-).)*$/. This expression is saying to exclude any tag slugs that include hash-.
Now, we won’t be creating pages for our internal content, but we can still access it from our other GraphQL queries. So let’s add it to our index.js page by adding this to our query:
query GhostIndexQuery($limit: Int!, $skip: Int!) {
    site {
      siteMetadata {
        title
      }
    }
    message: ghostPage
      (tags: {elemMatch: {slug: {eq: "hash-message"}}}) {
        fields {
          html
        }
    }
    allGhostPost(
        sort: { order: DESC, fields: [published_at] },
        limit: $limit,
        skip: $skip
    ) {
      edges {
        node {
          ...GhostPostFields
        }
      }
    }
  }
Here we are creating a new query called “message” that is looking for our internal content page by filtering specifically on the tag #message. Then let’s use the content from our #message page by adding this to our page:
//...
const BlogIndex = ({ data, location, pageContext }) => {
  const siteTitle = data.site.siteMetadata?.title || `Title`
  const posts = data.allGhostPost.edges
  const message = data.message;
//...
return (
  <Layout location={location} title={siteTitle}>
    <Seo title="All posts" />
    <section
      dangerouslySetInnerHTML={{
        __html: message.fields.html,
      }}
    />
  )
}
Finishing Touches
Now we’ve got a really great blog setup, but we can add a few final touches: pagination on our index page, a sitemap, and RSS feed.
First, to add pagination, we will need to convert our index.js page into a template. All we need to do is cut and paste our index.js file from our src/pages folder over to our src/templates folder and then add this to the section where we load our templates in gatsby-node.js:
// Load templates
 const indexTemplate = path.resolve(`./src/templates/index.js`)
Then we need to tell Gatsby to create our index page with our index.js template and tell it to create the pagination context.
Altogether we will add this code right after where we create our post pages:
// Create Index page with pagination
  paginate({
      createPage,
      items: posts,
      itemsPerPage: postsPerPage,
      component: indexTemplate,
      pathPrefix: ({ pageNumber }) => {
          if (pageNumber === 0) {
            return `/`
          } else {
              return `/page`
            }
      },
  })
Now let’s open up our index.js template and import our Pagination component and add it right underneath where we map through our posts:
import Pagination from '../components/pagination'
//...
      </ol>
      <Pagination pageContext={pageContext} />
    </Layout>
//...
Then we just need to change the link to our blog posts from:
<Link to={post.node.slug} itemProp="url">
to:
<Link to={`/${post.node.slug}/`} itemProp="url">
This prevents Gatsby Link from prefixing our links on pagination pages — in other words, if we didn’t do this, a link on page 2 would show as /page/2/my-post/ instead of just /my-post/ like we want.
With that done, let’s set up our RSS feed. This is a pretty simple step, as we can use a ready-made script from the Ghost team’s Gatsby starter. Let’s copy their file generate-feed.js into our src/utils folder.
Then let’s use it in our gatsby-config.js by replacing the existing gatsby-plugin-feed section with:
{
  resolve: `gatsby-plugin-feed`,
  options: {
      query: `
      {
          allGhostSettings {
              edges {
                  node {
                      title
                      description
                  }
              }
          }
      }
    `,
      feeds: [
          generateRSSFeed(config),
      ],
  },
}
We will need to import our script along with our siteConfig.js file:
const config = require(`./src/utils/siteConfig`);
const generateRSSFeed = require(`./src/utils/generate-feed`);
//...
Finally, we need to make one important addition to our generate-feed.js file. Right after the GraphQL query and the output field, we need to add a title field:
#...
output: `/rss.xml`,
title: "Gatsby Starter Blog RSS Feed",
#...
Without this title field, gatsby-plugin-feed will throw an error on the build.
Then for our last finishing touch, let’s add our sitemap by installing the package gatsby-plugin-advanced-sitemap:
npm install --save gatsby-plugin-advanced-sitemap
And adding it to our gatsby-config.js file:
{
  resolve: `gatsby-plugin-advanced-sitemap`,
  options: {
      query: `
        {
            allGhostPost {
                edges {
                    node {
                        id
                        slug
                        updated_at
                        created_at
                        feature_image
                    }
                }
            }
            allGhostPage {
                edges {
                    node {
                        id
                        slug
                        updated_at
                        created_at
                        feature_image
                    }
                }
            }
            allGhostTag {
                edges {
                    node {
                        id
                        slug
                        feature_image
                    }
                }
            }
            allGhostAuthor {
                edges {
                    node {
                        id
                        slug
                        profile_image
                    }
                }
            }
        }`,
        mapping: {
            allGhostPost: {
                sitemap: `posts`,
            },
            allGhostTag: {
                sitemap: `tags`,
            },
            allGhostAuthor: {
                sitemap: `authors`,
            },
            allGhostPage: {
                sitemap: `pages`,
            },
        },
        exclude: [
            `/dev-404-page`,
            `/404`,
            `/404.html`,
            `/offline-plugin-app-shell-fallback`,
        ],
        createLinkInHead: true,
        addUncaughtPages: true,
    }
}
}
The query, which also comes from the Ghost team’s Gatsby starter, creates individual sitemaps for our pages and posts as well as our author and tag pages.
Now, we just have to make one small change to this query to exclude our internal content. Same as we did in the prior step, we need to update these queries to filter out tag slugs that contain ‘hash-’:
allGhostPage(filter: {tags: {elemMatch: {slug: {regex: "/^((?!hash-).)*$/"}}}}) {
    edges {
        node {
            id
            slug
            updated_at
            created_at
            feature_image
        }
    }
}
allGhostTag(filter: {slug: {regex: "/^((?!hash-).)*$/"}}) {
    edges {
        node {
            id
            slug
            feature_image
        }
    }
}
Wrapping Up
With that, you now have a fully functioning Ghost blog running on Gatsby that you can customize from here. You can create all of your content by running Ghost on your localhost and then when you are ready to deploy, you simply run:
gatsby build
And then you can deploy to Netlify using their command-line tool:
netlify deploy -p
Since your content only lives on your local machine, it is also a good idea to make occasional backups, which you can do using Ghost’s export feature.
This exports all of your content to a json file. Note, it doesn’t include your images, but these will be saved on the cloud anyway so you don’t need to worry as much about backing these up.
I hope you enjoyed this tutorial where we covered:
- Setting up Ghost and Gatsby;
- Handling Ghost Images using a storage converter;
- Converting Ghost internal links to Gatsby Link;
- Adding templates and styles for all Ghost content types;
- Using dynamic content created in Ghost;
- Setting up RSS feeds, sitemaps, and pagination.
If you are interested in exploring further what’s possible with a headless CMS, check out my work at Epilocal, where I’m using a similar tech stack to build tools for local news and other independent, online publishers.
Note: You can find the full code for this project on Github here, and you can also see a working demo here.
Further Reading on Smashing Magazine
- “Building Gatsby Themes For WordPress-Powered Websites,” Paulina Hetman
- “Building An API With Gatsby Functions,” Paul Scanlon
- “Advanced GraphQL Usage In Gatsby Websites,” Aleem Isiaka
- “Gatsby Serverless Functions And The International Space Station,” Paul Scanlon


